

Knowing how to build a pavilion starts with careful planning, including choosing the right location, designing for your climate, selecting durable timber, and preparing a foundation that will support the structure for decades. Building a timber frame pavilion requires more than setting posts and installing a roof. Whether you’re building in Utah or ordering a pre-cut timber frame kit for delivery elsewhere in the U.S., understanding each stage before construction begins helps prevent costly mistakes and creates a stronger, longer-lasting outdoor structure.
Quick Answer: Building a timber frame pavilion involves five main steps: choose the size and location, obtain any required permits, build a foundation designed for your site conditions, select quality Douglas Fir or Western Red Cedar timbers, and assemble the frame using traditional mortise-and-tenon joinery. Following these steps creates a durable pavilion that can last for decades, whether it’s built on-site in Utah or assembled from a pre-cut kit shipped nationwide.
Planning Your Timber Frame Pavilion: Size, Location, and Style
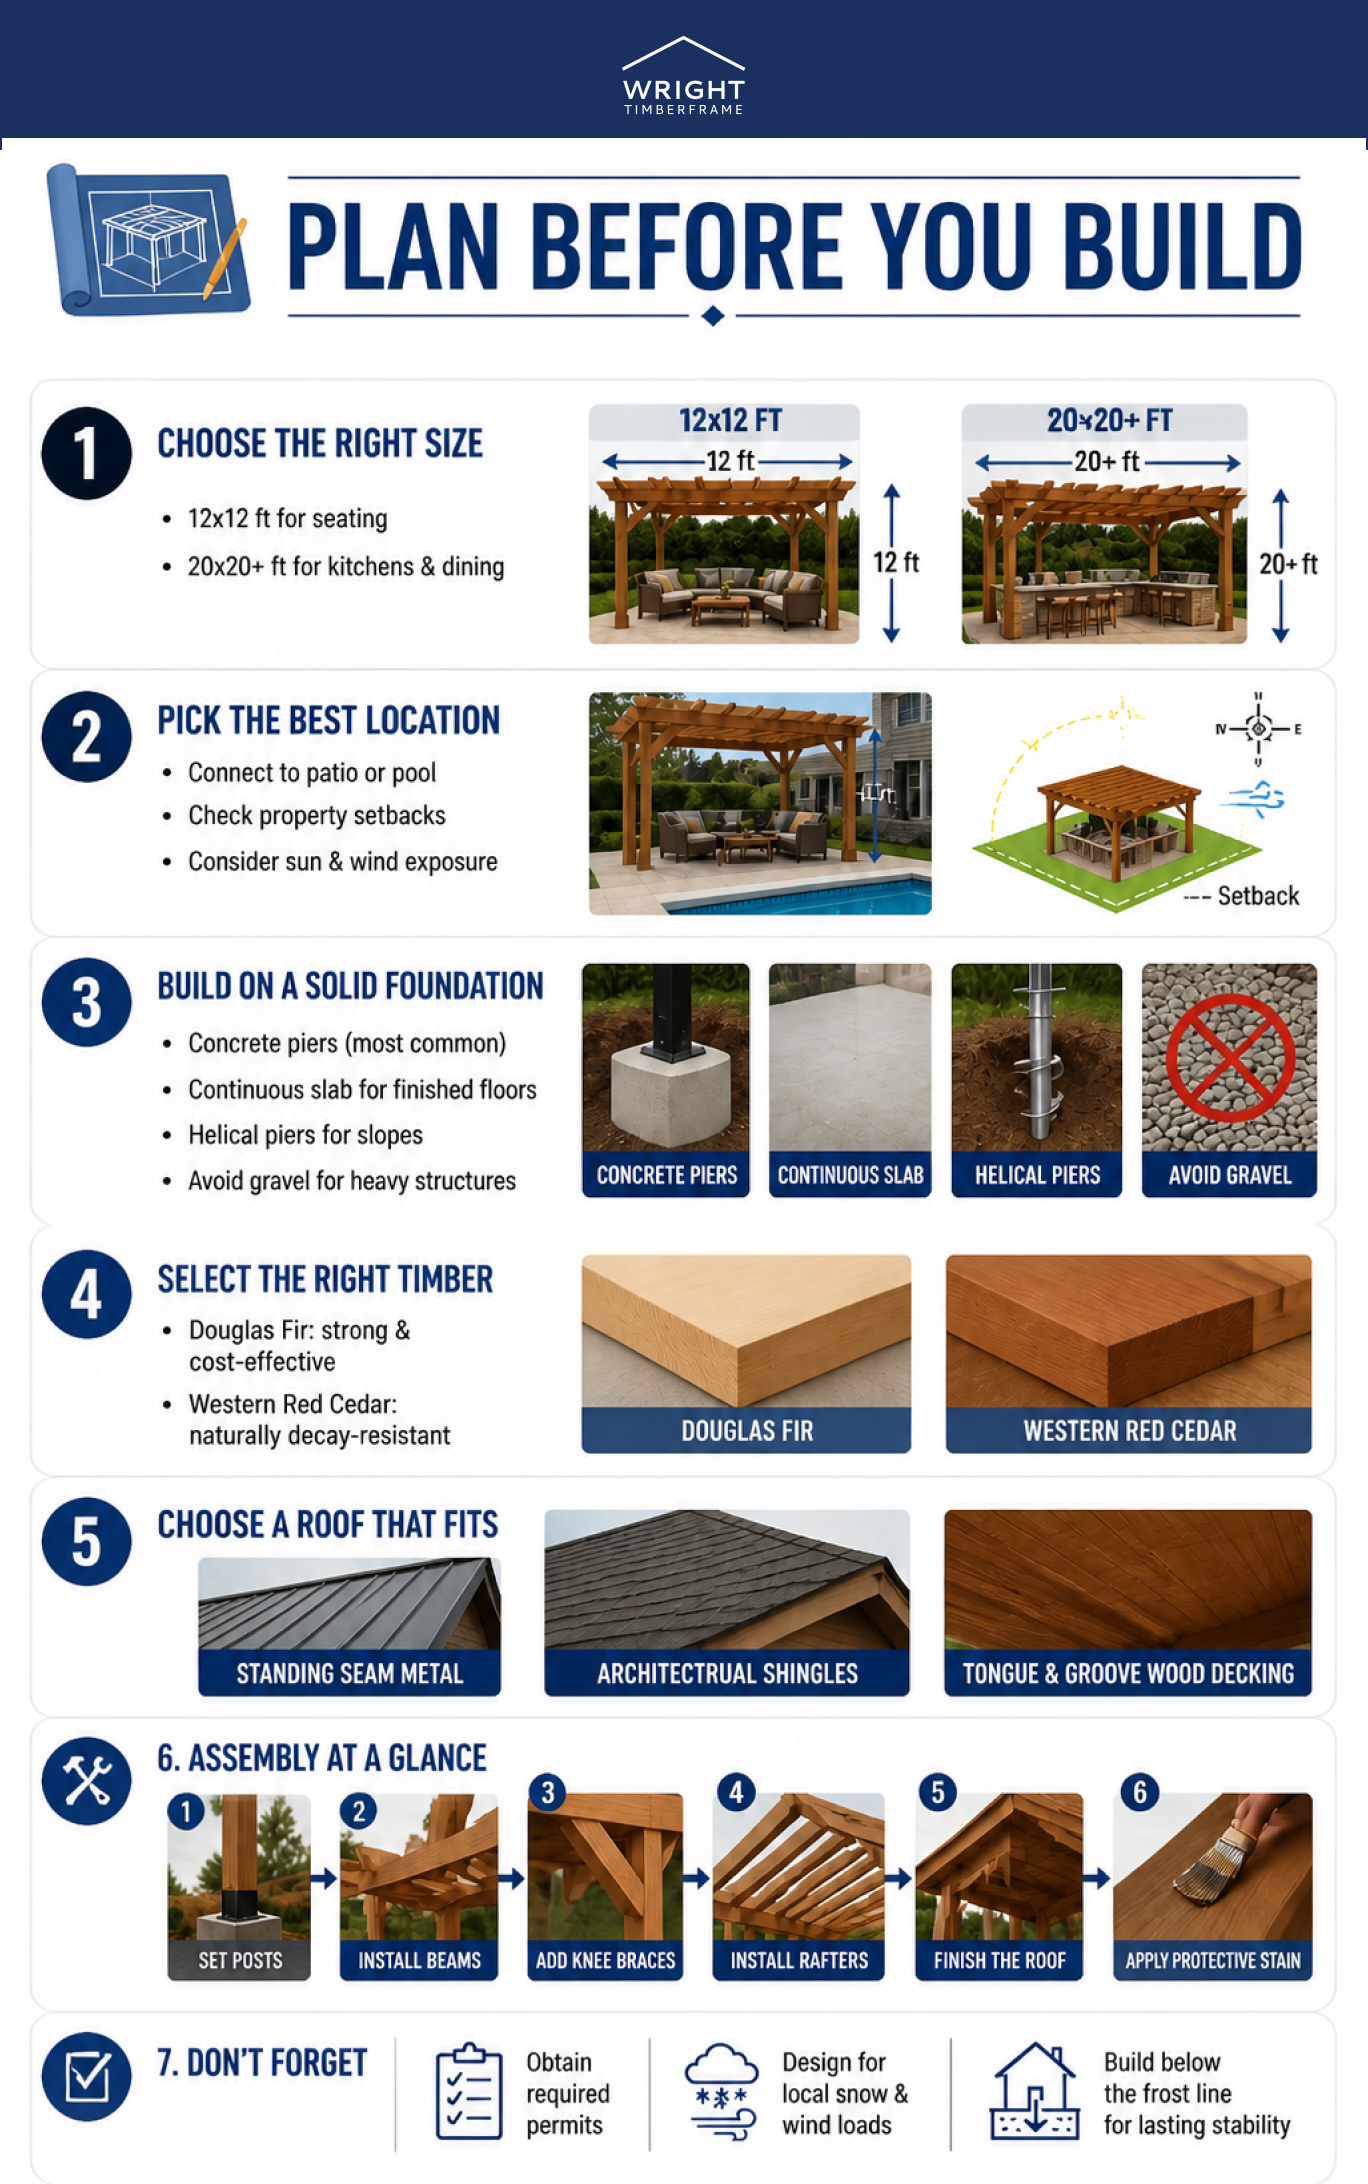
Planning a timber frame pavilion starts with three decisions: how big it needs to be, where it sits on your lot, and which structural style fits the way you use your yard. Most Utah pavilions we build start around 12 feet by 12 feet for a simple shaded seating area and run up to 20 feet by 20 feet or larger for a full outdoor kitchen and dining space. Size drives everything downstream, from the footing layout to the beam spans the frame needs to carry safely, so it pays to settle this number before you sketch anything else.
Location matters as much as size. Think about how the pavilion will connect to your existing patio, pool deck, or lawn, and whether a freestanding structure out in the yard makes more sense than one set close to the house for easy access to an indoor kitchen. A pavilion built too close to a property line can trigger setback issues before you even get to the permit office, so walk the site with a tape measure and your lot survey in hand.
Sun path and wind exposure change the design, too. A pavilion facing south often needs a UV-rated finish and a slightly steeper roof pitch to shed the higher summer light, while a north-facing structure stays shadier through the day and holds its stain color longer. Utah’s Wasatch Front also sees heavier wind gusts on open lots than in a tree-lined subdivision, which affects how the posts and knee braces get sized. We walk every site with our clients before finalizing a design because the same 16-foot by 16-foot footprint performs differently on a sloped lot than it does on flat ground, and the plan should reflect the site, not a generic template.
Permits and Zoning for a Pavilion in Utah
A timber frame pavilion in Utah almost always needs a building permit, and in some cities an electrical permit too, though the exact threshold and process vary by jurisdiction. Most Utah municipalities require a permit once a structure exceeds a set square footage or includes a permanent foundation, and if you plan to wire in a ceiling fan or permanent lighting, expect an electrical permit on top of the building permit. These thresholds differ from Salt Lake County to Utah County to Davis County, and they change from year to year, so confirm the specifics with your local building department before you order materials or dig a single footing.
Snow load and wind load also factor into what your local building official asks to see on your plans. The Wasatch Front sees heavier snow accumulation in some benches and canyons than it does down on the valley floor, and a plan reviewer will want the roof and beam sizing to reflect the load your specific address carries, not a citywide average. HOA design guidelines add a second layer that many homeowners forget to check, since some communities restrict roof pitch, height, or visible stain color separately from what the city allows.
Our guide to pavilion permits in Utah walks through the general permitting process city by city in more detail, and our design team handles the structural drawings your building department will ask for. No article, including this one, can substitute for confirming the actual number with your city planner, so treat every figure here as a starting point for that conversation, not a final answer.
Choosing the Right Foundation for Your Pavilion
The foundation you choose for a timber frame pavilion depends on your soil, your local frost depth, and how permanent you want the structure to be. Concrete pier footings, sometimes called sonotube footings, are the most common choice for a freestanding pavilion because they carry the point loads from each post down below the frost line without the cost of a full continuous footing. A continuous perimeter footing makes more sense when the pavilion includes a poured concrete floor slab, since the footing and the slab edge form one connected system.
Helical piers are worth a look on a sloped site or where the soil is loose fill rather than native ground, since a crew can install them faster than digging and pouring concrete, though the material cost usually runs higher. A gravel or paver base works for a small, lightweight, freestanding structure, but it is not a substitute for engineered footings once posts start carrying real snow load, and we do not recommend it for anything beyond the smallest garden structure.
Frost Depth and Soil Considerations for Utah Pavilions
Footings need to sit below the local frost line so seasonal freezing and thawing do not heave a post out of level over time, and that depth varies across Utah’s benches, valleys, and higher-elevation lots. Soil type changes the picture too: clay-heavy soil expands and contracts more than sandy or well-drained soil, which can call for a deeper or wider footing in the same city depending on the specific lot.
Concrete Pier Footings vs. Continuous Slab Foundations
Concrete pier footings are typically the more economical option for a pavilion that sits on an existing patio or lawn, since the crew only excavates at each post location rather than around the entire perimeter. A continuous slab foundation costs more up front, but it gives you a finished, level floor in the same phase of construction, which some homeowners prefer over adding pavers or stamped concrete later.
|
Foundation Type |
Best For |
Trade-Offs |
|
Concrete pier / sonotube |
Most freestanding pavilions |
Requires excavation below frost line; cost scales with depth and post count |
|
Continuous perimeter footing |
Pavilions with an attached slab floor |
More excavation and material; higher upfront cost |
|
Helical piers |
Sloped sites or loose fill soil |
Faster install; higher material cost than concrete |
|
Gravel or paver base |
Small, lightweight garden structures only |
Not engineered for heavy snow-load posts |
Selecting Your Timber Frame Species: Douglas Fir vs. Western Red Cedar
We build every timber frame pavilion with select Douglas Fir as the standard, or Western Red Cedar as a premium upgrade, and we never use pressure-treated pine or engineered composite posts. Douglas Fir gives a straight, tight grain and a warm tone that takes stain evenly, and it has the strength-to-weight ratio that structural framing depends on, a property APA – The Engineered Wood Association documents across its span and grading standards for structural wood construction. Western Red Cedar carries natural oils that give it higher decay resistance straight out of the mill, along with a reddish tone that many homeowners choose for a more rustic look. The Western Red Cedar Lumber Association documents this natural resistance as one of the species’ defining characteristics.
Species affects more than looks. Cedar handles high-moisture, high-exposure locations, like a pavilion near a pool or sprinkler head, with less maintenance over time than Douglas Fir needs in the same spot. Douglas Fir remains the most economical standard for most Utah installs and performs well with a proper UV-rated finish reapplied on a normal schedule.
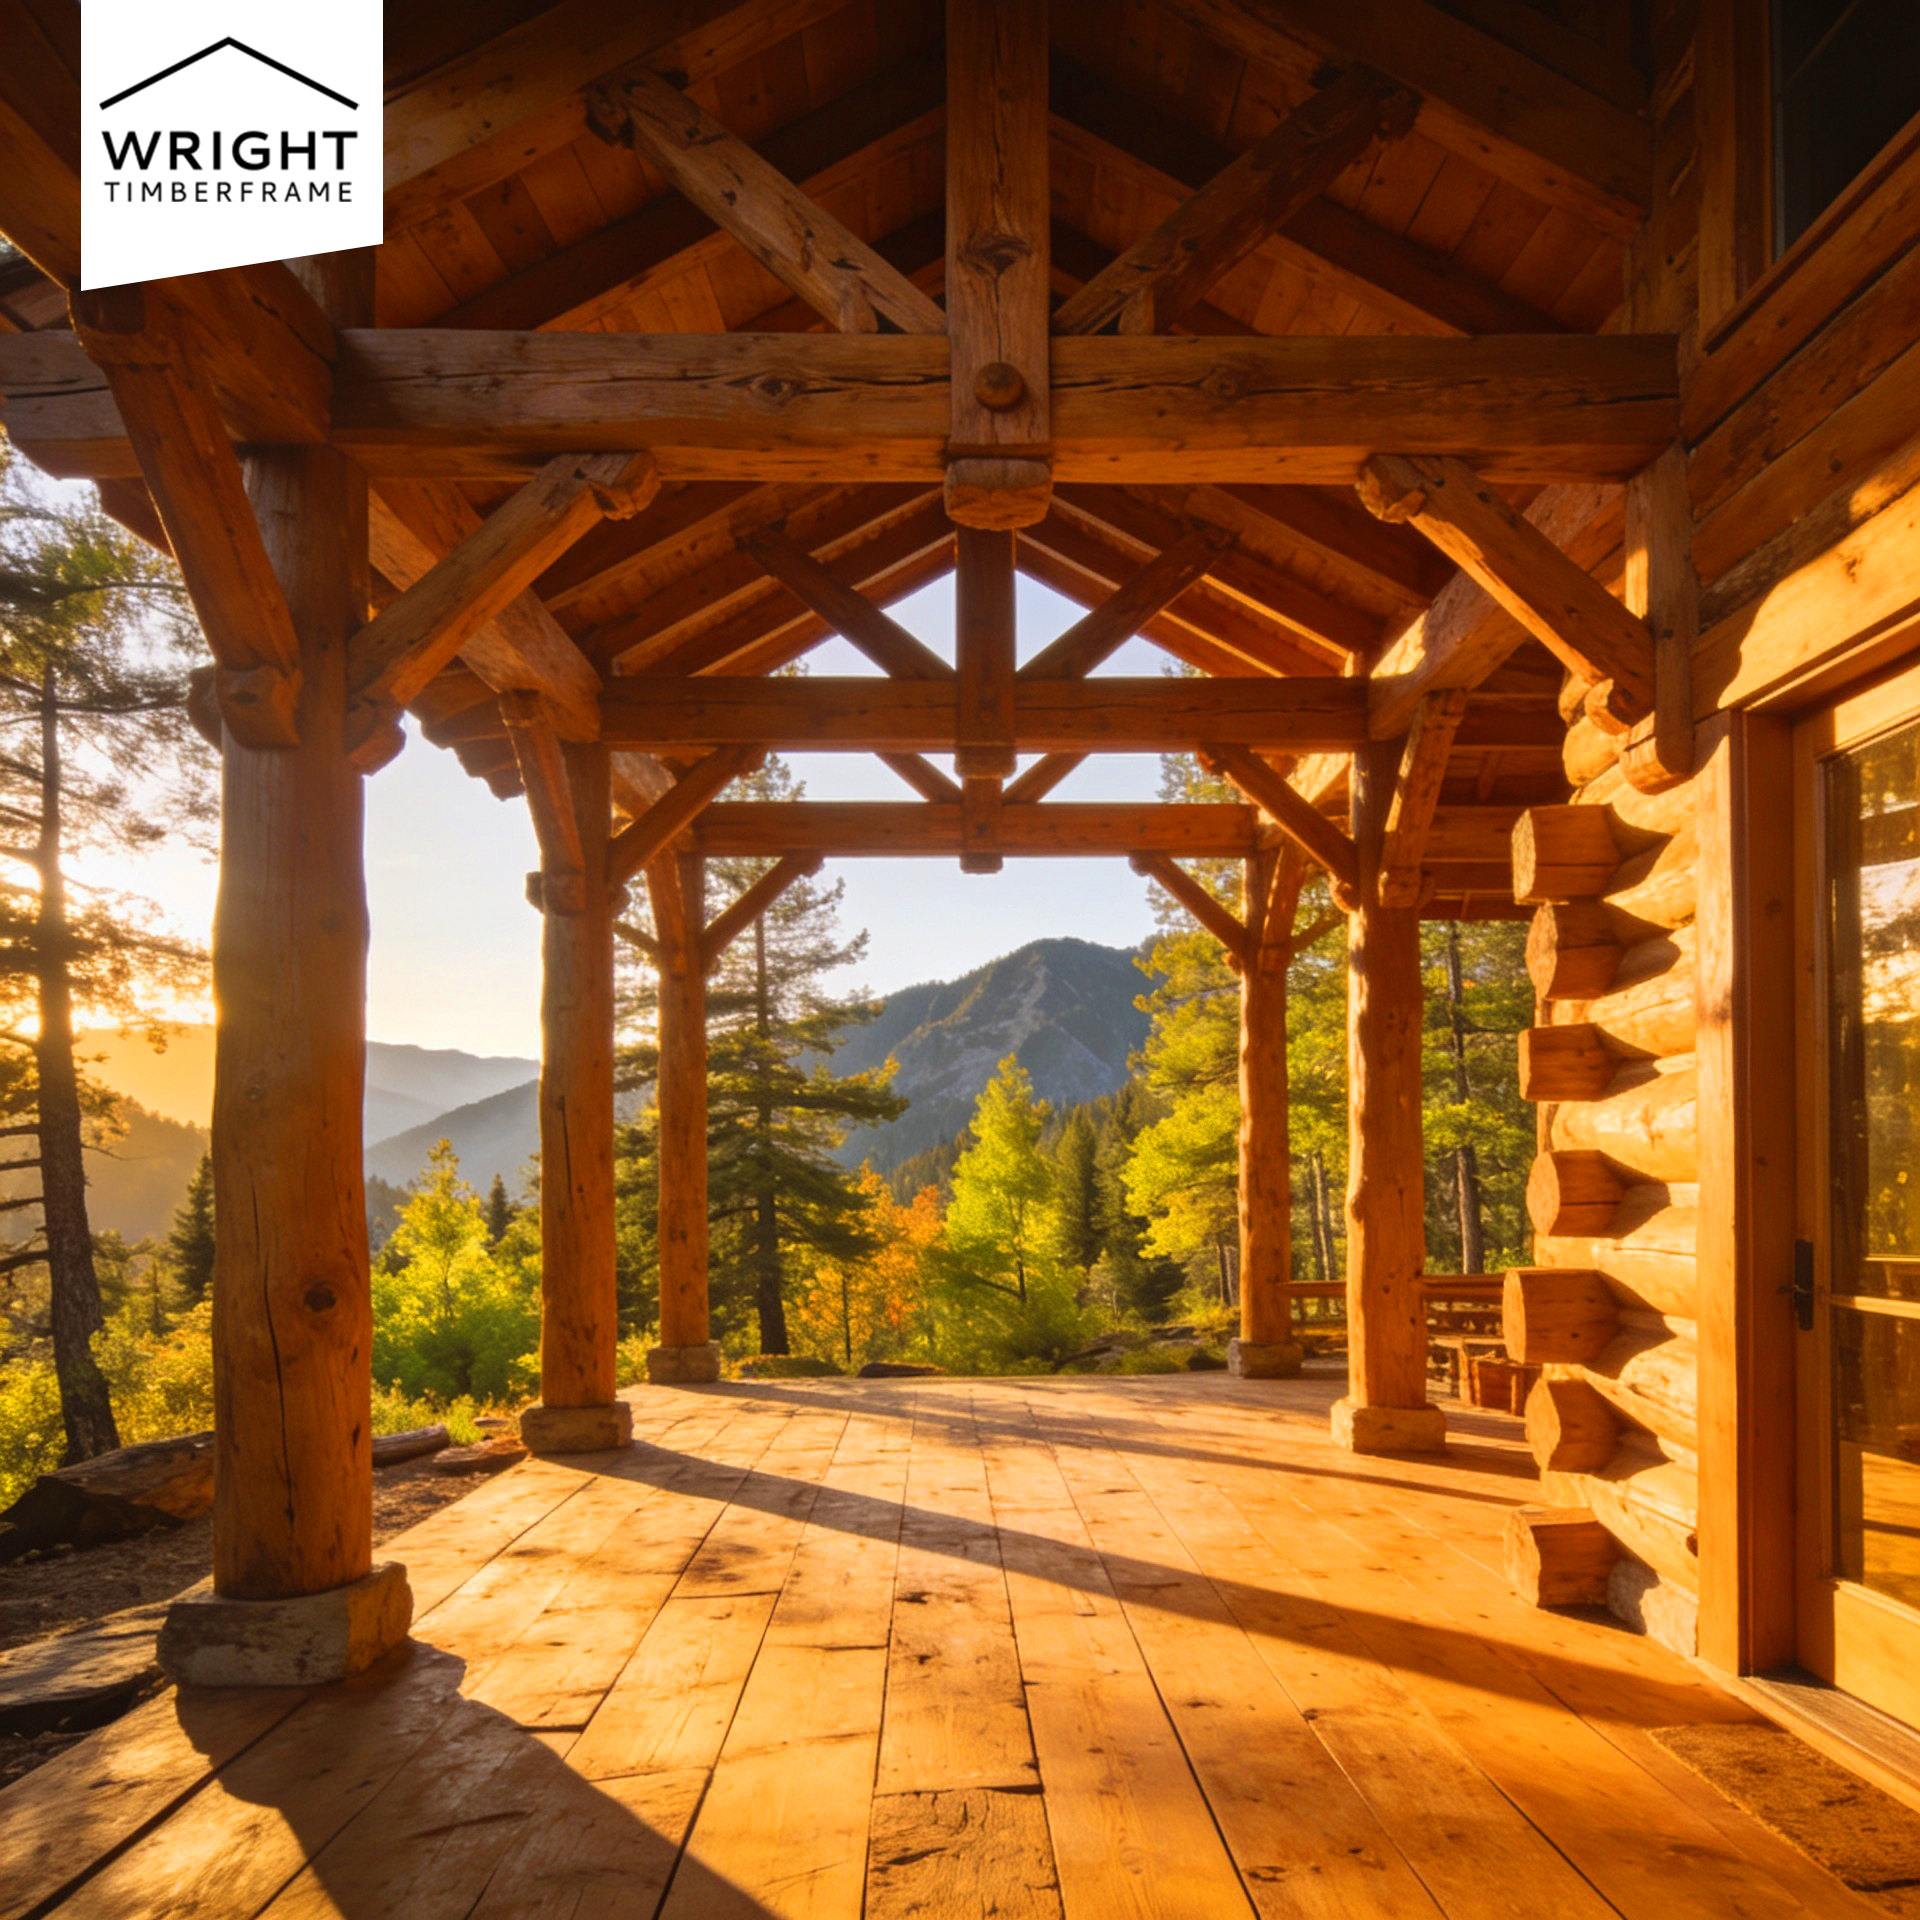
Grain and appearance differ too, and it is worth seeing both in person before you decide. Douglas Fir shows tighter, straighter grain lines and a lighter honey tone that darkens slightly with a clear or lightly tinted stain, while Western Red Cedar shows a looser grain and a warmer reddish cast that many homeowners pair with a darker finish. Neither species is right or wrong; the choice usually comes down to how much natural decay resistance your site needs versus the look you want on your beams. If you’re still weighing the options, our guide to choosing wood for a timber frame pavilion explores each species, their performance, and the best applications in more detail.
|
Species |
Character |
Decay Resistance |
Typical Use |
|
Douglas Fir |
Straight grain, warm tone |
Good with a maintained finish |
Standard posts and beams for most installs |
|
Western Red Cedar |
Reddish tone, natural oils |
Naturally higher, even unfinished |
Upgrade for pool-adjacent or high-exposure structures |
|
Pressure-treated pine (market comparison only) |
Green or brown cast, visible grain |
Chemical treatment, not natural |
Not used by Wright Timberframe |
Why We Don’t Use Pressure-Treated Pine or Metal Brackets
Pressure-treated pine relies on chemical treatment for its rot resistance rather than the wood’s own density and oils, and it tends to warp and check more aggressively as it dries on site. Metal brackets solve the same joinery problem a mortise-and-tenon joint solves, but they concentrate load at a single bolted connection instead of spreading it across an interlocking wood-to-wood joint. We cut every post-to-beam connection as a mortise-and-tenon joint, which is stronger than a bracket-and-bolt connection and ages without the rust stains that show up around exposed hardware.
Roofing Options for a Timber Frame Pavilion
A timber frame pavilion roof typically uses standing seam metal, architectural asphalt shingles, or tongue and groove wood decking under a breathable underlayment, and the right choice comes down to your roof pitch, your budget, and how much snow your site collects each winter. We help clients weigh these options against the beam spacing already built into their design, since a roofing material chosen after the frame is up rarely fits as cleanly as one planned from the start.
|
Roofing Material |
Best For |
Trade-Offs |
|
Standing seam metal |
Steep or shallow pitch roofs in heavy snow areas |
Higher material cost; sheds snow fast and holds its finish under UV exposure |
|
Architectural asphalt shingles |
Matching an existing home roofline |
Lower upfront cost; needs more frequent inspection under high UV exposure |
|
Tongue and groove wood decking |
An exposed-beam, all-timber look |
Needs breathable underlayment and periodic refinishing to match the frame |
|
Polycarbonate or fabric panel |
Partial-shade, patio-style structures |
Not built for a full Utah snow load; better suited to a pergola than a pavilion |
Roof pitch affects more than looks. A steeper pitch sheds snow faster and reduces the load your posts and knee braces carry through a heavy winter, while a lower pitch reads as more contemporary but asks more of the structural frame underneath. Moisture management matters just as much as load: a wood-based roof deck needs a breathable underlayment, so trapped moisture does not sit against the timber, a detail the USDA Forest Products Laboratory’s wood handbook covers in its chapters on drying and moisture control.
How to Build a Timber Frame Pavilion: The Assembly Process, Step by Step
Assembling a timber frame pavilion follows the same basic sequence whether our crew installs it on site or a homeowner puts together a pre-cut kit shipped to their door: set the posts, raise the beams, cut in the knee braces, add the rafters, then finish the roof.
- Set each post on its footing and check plumb before anything else gets attached.
- Raise and level the main beams, seating each mortise-and-tenon joint by hand rather than forcing it with a bracket.
- Cut and fit the knee braces that triangulate the frame and carry wind and snow load down into the posts.
- Install the rafters and purlins that will carry the roof decking.
- Add the roof decking and your chosen roofing material.
- Apply a UV-rated Behr stain in the color you picked during design.
For a kit, the process narrows to three choices before the pieces even ship: a beam profile, a knee-brace style, and a Behr stain color. Every kit arrives pre-cut and pre-stained, with the same mortise-and-tenon joints that interlock at the corners and support beams that slide into place, which is why a handy homeowner can assemble one over a long weekend without cutting a single joint on site. Browse our pre-cut timber frame kits to see the beam profiles and stain colors available nationwide.

Setting Posts and Cutting Knee Braces Without Metal Brackets
Every post-to-beam connection in a Wright Timberframe pavilion is a mortise-and-tenon joint, cut so the tenon seats fully into the mortise before any wedge or peg locks it in place. Knee braces triangulate the frame between post and beam, and we cut these the same way, wood-to-wood, so the finished structure has no exposed bolt heads or bracket plates to rust or work loose over time. Our traditional timber frame joinery guide covers the joint types in more detail.
What You Need for a DIY Kit Assembly
A homeowner assembling a pre-cut pavilion kit needs a drill and driver set, a socket set sized to the included hardware, a four-foot level, ratchet straps to hold beams in place while joints seat, and a ladder or scaffold tall enough to reach the roof line safely. Most kits go together with two to three people over a long weekend, though a larger footprint or a steeper roof pitch can stretch the timeline. Remote assistance from our team is available if a joint does not seat the way it should or a step in the instructions needs clarifying, so a DIY build is not something you take on without support.
Finishing and Maintaining Your Timber Frame Pavilion
We finish every timber frame pavilion with a UV-rated Behr stain in the color you choose, and keeping that finish maintained is the single biggest factor in how long your posts and beams hold their color and resist sun and moisture damage. A fresh coat blocks the UV rays that gray raw wood and slows the moisture cycling that drives checking, so a maintained finish protects both looks and structure.
Seasonal Maintenance Checklist for a Timber Frame Pavilion
- Spring: inspect for any checking that opened over winter, clear debris from post bases, and confirm footings still drain away from the structure.
- Summer: watch high-UV sides of the pavilion for early fading, since south-facing beams in Utah take the most direct sun exposure.
- Fall: clear leaves and needles from the roof and gutters before snow load season begins, and check knee braces for any movement.
- Winter: keep heavy snow from piling against posts at ground level, and avoid deicing salt near footings, since salt can degrade both concrete and finish over time.
Exactly how often to recoat depends on sun exposure, elevation, and the wood species you choose, so inspect the finish annually rather than following a fixed maintenance schedule; some south-facing structures may need attention sooner than a shaded, north-facing pavilion. If it has been a year or two since installation, consider a professional inspection to determine whether the finish needs restaining and whether any structural joints should be retightened as part of routine maintenance. Our full timber frame maintenance guide covers the seasonal checklist above in more depth, including how to tell normal checking from a problem worth a call.
Adding Lighting, Fans, and an Outdoor Kitchen
Wiring a ceiling fan, permanent lighting, or an outdoor kitchen into your timber frame pavilion usually means pulling an electrical permit in addition to your building permit, and planning the rough-in before the frame goes up saves you from fishing wire through finished beams later. We coordinate with your electrician during design so conduit runs through the posts and beams where it will not show once the frame is finished.
A pavilion built around a full outdoor kitchen needs extra clearance for ventilation and heat, along with a layout that keeps countertop and cooking space out of the direct roof drip line. Our guide to outdoor kitchen pergolas covers the ventilation and layout questions in more depth, and the same clearance principles apply whether the structure over your kitchen is a pergola or a pavilion.
Lighting choices range from simple string lights along the beams to recessed fixtures built into the roof deck, and either option should route through the frame during assembly rather than get surface-mounted afterward. Fixture spacing and wattage should be determined by your electrician to comply with local electrical codes and the manufacturer’s installation requirements, since both vary depending on the fixtures you choose and how the pavilion will be used.
Common Pavilion Construction Mistakes to Avoid
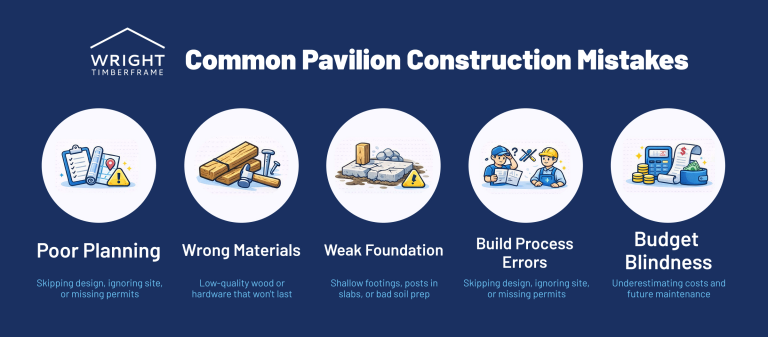
The most common pavilion construction mistakes come from skipping the permit step, undersizing the footings for the local frost depth, and choosing a wood species without checking its exposure rating for the spot you picked. Homeowners also frequently underestimate how much a roof line needs to account for snow shedding, which, on a flat or low-pitch design, can put more load on the frame than expected in the first heavy winter.
Our pavilion construction mistakes guide covers the full list in more detail, including planning errors we have caught and corrected on projects like our Suncrest Project, where an early site plan didn’t account for a slope that changed the footing depth needed at two of the four corners.
Checking Versus Cracking: What to Expect from Real Timber
New timber frame beams often develop fine surface splits called checking as the wood releases moisture after milling. This is normal for real, solid wood and is different from a structural crack that runs through a load-bearing connection. This surprises some new pavilion owners the first time they see a split appear on a beam that is otherwise doing exactly what solid timber does as it dries.
Timber Frame Pavilion vs. Pergola: Which Fits Your Yard
A timber frame pavilion gives full roof coverage and shelter from rain and snow, while a pergola gives open or slatted-roof shade without full weather protection, and many Utah yards eventually add both structures for different parts of the property. Choosing between them comes down to how you plan to use the space and whether year-round shelter matters more than an airy, partially shaded feel.
|
Feature |
Pavilion |
Pergola |
|
Roof coverage |
Solid roof, full weather shelter |
Open or slatted roof, partial shade |
|
Best use |
Outdoor kitchen, year-round dining, entertaining |
Shaded seating, climbing plants, patio anchor |
|
Foundation |
Concrete piers or a slab foundation |
Concrete piers, sometimes a lighter footing |
|
Typical cost range |
Higher, due to roof structure and materials |
Quoted individually based on size, materials, and design. |
Our full comparison of timber frame pavilions and pergolas walks through the structural differences in more depth, including how each performs under Utah snow load and which one fits a smaller lot.
What Does a Timber Frame Pavilion Cost?
A custom timber frame pavilion in Utah typically runs from about $15,000 to $30,000, depending on size, materials, and design. Pergolas, trellises, and kit structures are quoted individually because pricing varies with size, materials, site conditions, and customization, so we provide a free, no-obligation quote for your specific project.
|
Cost Driver |
Impact |
|
Size and footprint |
Larger structures need more timber, larger beams, and more footings |
|
Wood species |
Western Red Cedar costs more than the Douglas Fir standard |
|
Foundation type |
Concrete piers typically cost less than helical piers or a full slab |
|
Roofing and finish |
Premium roofing material and additional stain coats add cost |
|
Site access and slope |
Difficult access or a sloped lot raises labor and equipment cost |
Every one of these factors is specific to your lot and your design, which is why we walk the site before giving a number. The pavilion cost range above is provided as a general estimate only. Your final price depends on your design, material selections, site conditions, and local construction requirements and will be confirmed after reviewing your project plans. See our custom timber frame pavilion page for the full service scope.
DIY Kit vs. Hiring a Professional Pavilion Builder
A pre-cut pavilion kit works well for a handy homeowner comfortable with a multi-day build and willing to manage their own permit and foundation work, while hiring a professional crew makes more sense for larger structures, difficult sites, or when you want the permit, inspection, and warranty handled for you.
|
Factor |
DIY Kit |
Professional Install |
|
Timeline |
Days to a long weekend for an experienced builder |
Crew manages the full schedule start to finish |
|
Permit handling |
Homeowner’s responsibility |
Often coordinated as part of the project |
|
Foundation work |
Homeowner arranges footings or slab separately |
Crew coordinates footings as part of the build |
We hold a 4.9-star rating on Google from homeowners who worked with the same local crew from design through installation, and we’ve completed hundreds of timber structures across Utah over more than 10 years. See our custom pavilion builders page if you would rather hand off the entire project.
Frequently Asked Questions
How long does it take to build a timber frame pavilion?
The timeline depends on the size of the project, permit approval, and whether the homeowner chooses one of Wright Timberframe’s professionally installed pavilions or a DIY kit. Wright Timberframe typically completes professionally installed pavilion projects in about 2-4 weeks after the design is approved and the order is placed, while many homeowners with basic carpentry skills and help from a friend have successfully assembled Wright Timberframe’s pre-cut DIY kits over a weekend. Because every project is custom and permitting requirements vary, homeowners should confirm their expected timeline with the Wright Timberframe team before construction begins.
Do I need a permit to build a pavilion in Utah?
Most Utah cities require a building permit for a pavilion once it exceeds a certain size or sits on a permanent foundation, and some require an electrical permit for wired lighting or fans. Confirm the exact threshold with your city or county building department before construction starts.
What is the difference between checking and cracking in timber?
Checking is a normal surface split that appears as solid wood loses moisture after milling, and it does not affect the structural strength of a mortise-and-tenon joint. A structural crack runs through a load-bearing connection and needs a builder’s evaluation.
Can I order a pavilion as a kit if I live outside Utah?
Yes. Wright Timberframe ships pre-cut timber frame pavilion kits nationwide, using the same traditional mortise-and-tenon joinery featured in its professionally installed pavilions. Homeowners with questions about shipping or delivery to their location should contact the Wright Timberframe team before placing an order.
What size pavilion do I need?
Most homeowners start with around 12 by 12 feet for a simple seating area and move up to 20 by 20 feet or larger for a full outdoor kitchen and dining setup. The right size depends on how you plan to use the space and how it fits your lot.
How long does a timber frame pavilion last?
The lifespan of a Wright Timberframe pavilion depends on the wood species chosen, the quality of the installation, the local climate, and how well the structure is maintained. With proper care and routine maintenance, a timber frame pavilion is designed to provide decades of outdoor enjoyment. Because every project is unique, homeowners should speak with the Wright Timberframe team about the expected longevity for their specific pavilion and location.
Should I choose Douglas Fir or Western Red Cedar for my pavilion?
Douglas Fir is Wright Timberframe’s standard and works well for most Utah sites with a maintained UV-rated finish, while Western Red Cedar is worth the upgrade for pool-adjacent or high-moisture spots because of its natural decay resistance. Either species is joined the same way, with mortise-and-tenon joinery and no metal brackets.
What tools do I need to assemble a pavilion kit?
A basic tool kit covers most pavilion assemblies: a drill and driver, a socket set matched to the included hardware, a level, ratchet straps, and a ladder or scaffold. Wright Timberframe kits include an assembly guide, and remote assistance is available if a step needs clarification.
Can I add a fire pit or fireplace under my pavilion?
Yes, Wright Timberframe can help design a timber frame pavilion that accommodates features such as an outdoor fireplace or other custom amenities. The exact placement and installation requirements depend on the type of fire feature, the manufacturer’s specifications, and local building and fire codes. Homeowners should confirm all clearance and ventilation requirements with the Wright Timberframe team and their local building or fire authority before finalizing the design.
Get Your Timber Frame Pavilion Started
Ready to move from planning to a real set of drawings for your site? Get a free quote today, and our local Utah crew will walk your site, talk through Douglas Fir or Western Red Cedar, and give you a free, no-obligation quote built around your actual lot, not a generic template.

