

Can you add electrical to a timber-frame pergola? Many Utah homeowners want to add lighting, ceiling fans, or outdoor outlets but aren’t sure whether electrical can be installed or when it should be planned. The challenge is that concealed wiring needs to be considered before the timber frame is fabricated, making early planning an important part of the design process. At Wright Timberframe, we coordinate with you and your electrician to incorporate electrical into your custom timber-frame pergolas whenever possible.
Quick Answer: Yes. A timber-frame pergola can be wired for lighting, ceiling fans, and weatherproof outlets when the electrical layout is planned before construction. Planning the wiring during the design phase helps keep cables as concealed as the timber frame allows, while retrofitting after installation typically requires visible conduit or exposed wiring.
Why We Plan Electrical Before the Frame Goes Up
We plan pergola electrical before construction because the wiring path needs to be worked out while the posts and beams are still being fabricated, not after the frame is standing in your yard. Once the posts and beams are cut and assembled with traditional mortise-and-tenon joinery, adding new wiring becomes more complex and can require additional drilling into the timber. Planning the electrical layout during the design stage allows wiring to remain as concealed as possible while preserving the clean appearance of the timber frame. We use premium Douglas Fir for outdoor structures and Western Red Cedar to create pergolas that combine lasting durability with thoughtful craftsmanship.
Tell us early if you want lighting, a fan, or an outlet on your pergola. Planning the wiring path before the frame leaves our shop helps preserve the clean appearance of the mortise-and-tenon joinery without visible conduit or surface-mounted components.
Popular Electrical Additions for a Timber-Frame Pergola
Most Utah homeowners add one of three things to a pergola: overhead lighting, a ceiling fan, or a weatherproof outlet, and many pergolas end up with all three. Each has its own mounting point, wiring path, and code consideration, so it helps to decide early which combination fits how you plan to use the space.
| Addition | How it’s typically used | Wiring note |
| Overhead lighting | String lights, sconces, or pendant fixtures for evening use | Can run low-voltage or line-voltage |
| Ceiling fan | Air movement for a covered patio pergola in summer heat | Needs a fan-rated outlet box |
| Weatherproof outlet | Powering speakers, a TV, or small appliances | Outdoor receptacles typically require GFCI protection; confirm local code requirements with your electrician |
String Lights, Sconces, and Pendant Lighting
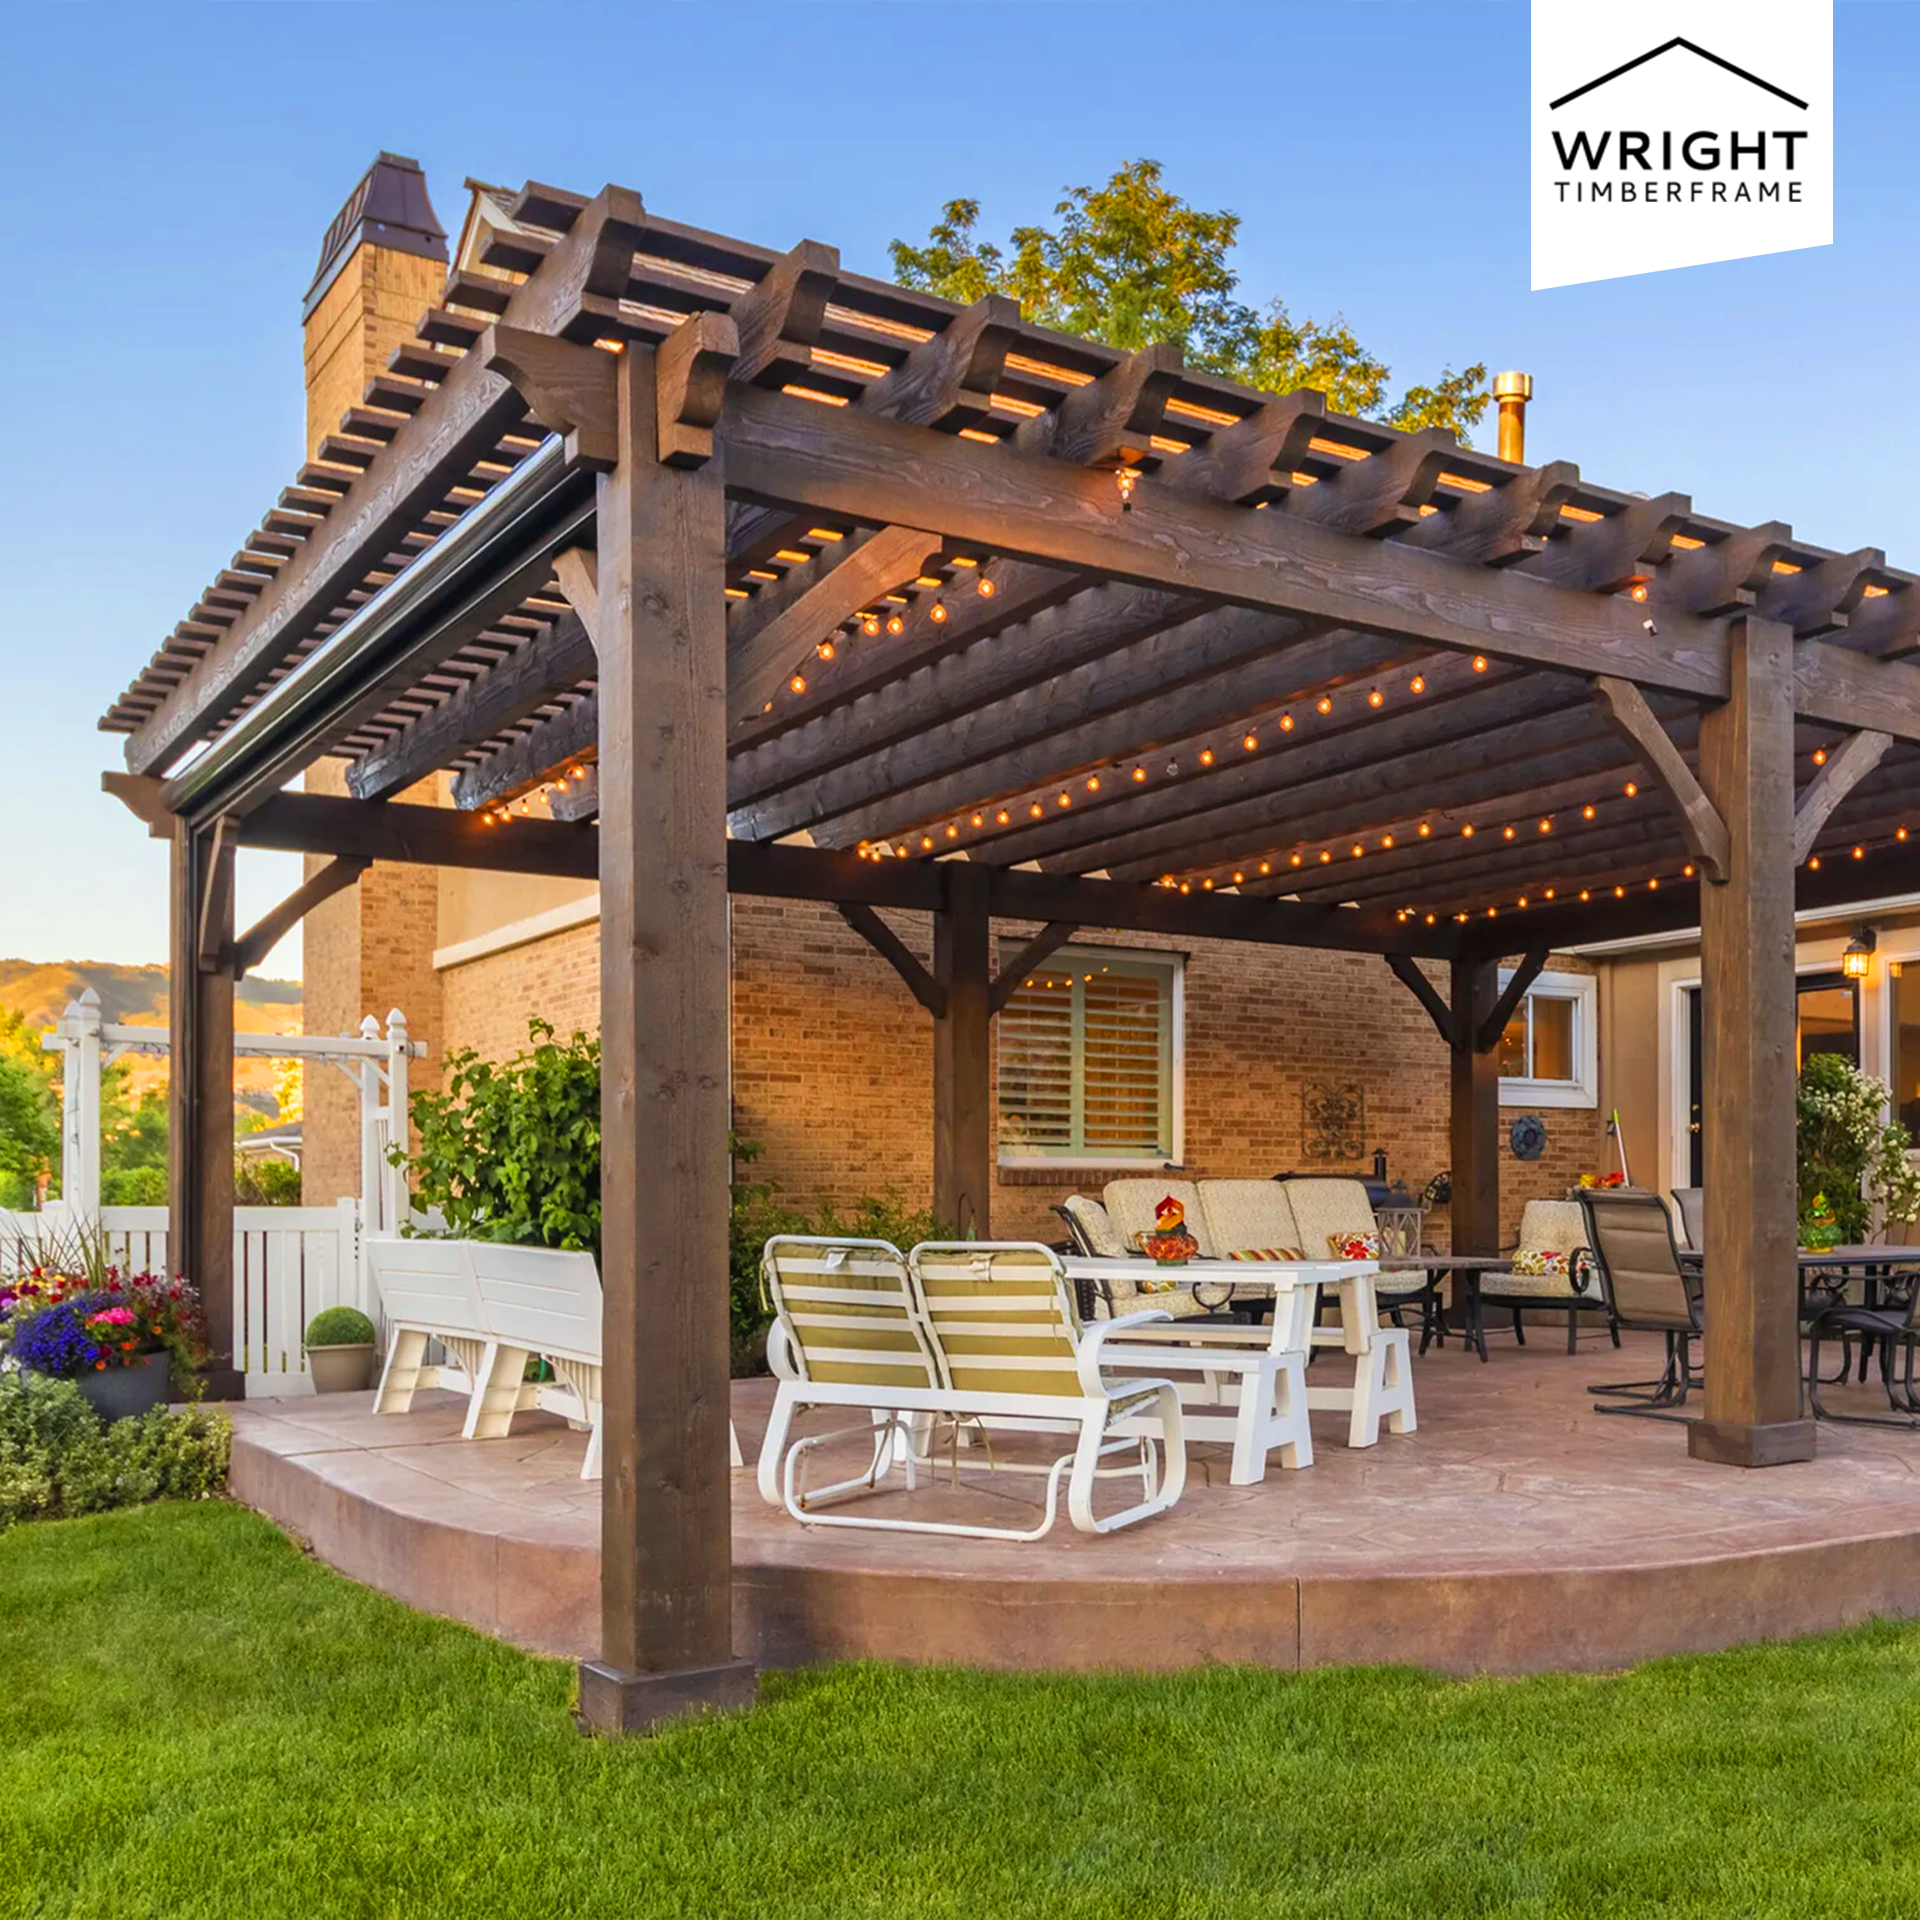 String lights are the most common lighting request we get, and they mount easily to the underside of the top beams or across the rafters. Wall sconces work well on an attached pergola where a post meets the house, since power is close by. Pendant fixtures hang from a beam and give a more finished look for a dining or entertaining area, though they need a dedicated junction point built into the beam during construction.
Low-voltage lighting runs off a transformer, which is usually the simplest option because it does not carry the same circuit requirements as a line-voltage run. Talk to us about where the transformer will live. Depending on the design, it can often be tucked near the base of a post or another discreet spot, so it stays out of sight but is still reachable if it ever needs to be swapped. Line-voltage lighting gives you more fixture choices and brighter output, but it has to be planned as a hardwired circuit with your electrician from the start.
Any fixture mounted outdoors also needs the correct moisture rating, not just a GFCI-protected circuit behind it. A damp-rated fixture is built for covered areas that see humidity but not direct rain, which describes most of the space under a pergola roof. A wet-rated fixture is built for direct exposure to rain and snow, which matters more for a fixture near an open edge of the frame or on a pergola with a partial or louvered roof. Your electrician can confirm which rating fits each fixture location.
Ceiling Fans on a Timber-Frame Pergola
A ceiling fan requires a properly supported mounting point rather than a standard light fixture box. By planning the fan location during the design phase, we can integrate the mounting support into the timber frame and coordinate the wiring before installation. This approach helps provide a secure installation while keeping wiring as concealed as the pergola’s design allows.
Utah summers are a common reason homeowners add a fan to a pergola, and the motor should carry a damp-rated listing since it sits in an open-air structure. Blade clearance matters too: we plan the beam height and fan drop together so the blades clear head height and any nearby railing or knee brace, rather than working around a fan that was bought before the frame was designed. Tell us the fan model, or at least its approximate size, before we finalize the beam layout.
Outlets and USB Charging Ports
A weatherproof outlet on a pergola post provides convenient power for string lights, outdoor speakers, or small appliances. But it needs ground-fault circuit-interrupter (GFCI) protection because it is installed outdoors. NFPA’s overview of the National Electrical Code explains that the NEC is the benchmark standard for safe electrical installations, while the U.S. Consumer Product Safety Commission’s GFCI safety guidance explains that GFCIs are designed to protect people where water and electricity may come into contact. Your electrician will confirm the specific GFCI and weatherproof-cover requirements that apply to your location.
Mounting height matters as much as mounting method in Utah. An outlet or switch placed low on a post can end up buried or blocked by a winter snowdrift along the Wasatch Front, so we typically plan permanent fixtures well above the expected snow line. It is a small detail, but one more reason to walk through fixture placement with us before the frame is built rather than after.
Planning a Wiring Path Around Mortise-and-Tenon Posts and Beams
Wiring on a timber-frame pergola generally follows one of two paths: concealed inside the frame where the design and structural placement allow it, or run along the surface once the frame is complete. Concealing wiring inside a post or beam keeps the mortise-and-tenon joints looking clean, since the path is planned around the joinery instead of added after the fact. Surface-mounted conduit is the more straightforward option for a pergola that is already built, and it works well, but it sits on top of the wood instead of inside it.
| Method | How it works | Best for |
| Concealed wiring path | Path planned through the post and beam during fabrication so cable stays out of sight | New builds, planned at design stage |
| Surface-mounted conduit | Conduit run attached to the outside of the post or beam after the frame is standing | Retrofits on an existing pergola |
Timber Checking and Wiring Placement on Douglas Fir Posts
As solid timber dries, it is normal for small surface checks to develop along the grain over time. These natural characteristics are part of the wood’s aging process and do not affect the structural integrity of the pergola. That’s another reason we plan the wiring layout before construction, allowing fixture locations and wire exits to be placed where they blend naturally with the finished timber. After installation, every wiring exit is finished to match the same UV-rated Behr stain used on the rest of the frame for a clean, seamless appearance.
Do You Need an Electrician or a Permit?

Yes, in nearly every Utah city and county, wiring for permanent outlets, hardwired lighting, or a ceiling fan on a pergola requires a licensed electrician and may also require an electrical permit, depending on local regulations. Permit requirements vary by city and county, so it’s important to confirm the applicable permit thresholds and inspection process before work begins. Learn more about pergola permit requirements in Utah to understand what may apply to your project.
Low-voltage string lights plugged into an existing outlet usually do not trigger a permit, but a new circuit, a hardwired fixture, or a new outlet almost always does. We handle the structural side of the conversation, meaning how the frame design accommodates the wiring path, and we point you to a licensed electrician for the wiring itself and the permit application. This split keeps the timber work and the electrical work each in the hands of the right professional.
Electrical Planning for a Kit vs. a Site-Built Utah Pergola
A site-built pergola by our Utah pergola builders gives us the most control over concealed wiring because we design, cut, and install every timber frame in-house. By planning the electrical layout before fabrication, we can design concealed wiring paths through the posts and beams, allowing your licensed electrician to complete the installation while maintaining a cleaner finished appearance. If you’re ordering a DIY pergola kit, let us know your lighting, fan, or outlet plans before it ships so we can discuss the best wiring options for your design.
Homeowners who choose a kit typically hire a local licensed electrician to complete the electrical work after assembly. Whether your pergola is installed by our Utah crew or assembled on-site, every frame features the same traditional mortise-and-tenon joinery and premium timber. Learn more about the differences in our custom vs. prefab pergola comparison.
If you’ve already purchased a kit without planning for electrical, you still have options. A local electrician can install surface-mounted conduit or use available framing spaces where practical, although this approach is usually more labor-intensive than incorporating wiring during the original design. For more planning tips, explore our custom pergola planning guide.
What to Tell Your Builder Before We Cut Your Frame
A short conversation before fabrication saves a retrofit later. Here is what we need from you to plan the wiring path correctly:
- Which fixtures you want: string lights, a pendant, a fan, an outlet, or a combination
- Roughly where each fixture should sit on the frame
- Where your power source is, so we can plan the shortest practical run
- Whether the pergola is attached to your house or freestanding, since that changes the routing options
- Whether you are hiring your own electrician or need a referral
Attached and freestanding pergolas route power differently. An attached pergola sitting against your house can often tap into an existing exterior circuit, which shortens the run and keeps labor costs down. A freestanding pergola out in the yard usually needs a new trench or a longer conduit run back to the house, since there is no wall to borrow power from. Tell us which type you are building early, since it changes both the wiring path and the cost estimate your electrician gives you.
Common Mistakes When Planning Pergola Electrical
One of the biggest mistakes homeowners make is waiting until the pergola is already built before deciding they want lighting, a ceiling fan, or outdoor outlets. At that point, wiring often has to be surface-mounted, which can affect the finished appearance and increase installation time.
Another common oversight is choosing fixtures before deciding where power will come from. The location of the power source, the number of fixtures, and whether the pergola is attached or freestanding all influence the wiring path and overall installation. Sharing these details with your builder and electrician early helps avoid unnecessary changes, keeps the design clean, and makes it easier to coordinate the project from fabrication through installation.
Another mistake is not planning for future electrical needs. Even if you’re only installing string lights today, you may decide to add a ceiling fan, outdoor speakers, or additional lighting later. Discussing these possibilities during the design phase gives your builder and electrician more flexibility when planning the wiring path, helping reduce the need for visible conduit or additional modifications in the future.
Budget Ranges for Adding Electrical
Electrical add-ons are quoted individually alongside your pergola, since the cost depends on run length, fixture count, and whether your electrician needs to open a wall to reach a power source. Use the table below as a general planning guide and confirm exact numbers with your electrician and with us during your free quote.
| Addition | What drives the cost | Price guidance |
| String lights (plug-in) | Fixture cost only, no new wiring | Low cost |
| Hardwired sconce or pendant | New circuit run, fixture, labor | Quoted individually |
| Ceiling fan | Fan-rated box, fixture, labor | Quoted individually |
| Weatherproof outlet | New circuit, GFCI device, labor | Quoted individually |
Because every project is custom, the most accurate way to budget electrical upgrades is to discuss your lighting, fan, and outlet requirements during your free Wright Timberframe quote and coordinate installation details with your licensed electrician.

Frequently Asked Questions
Can I add electrical to a pergola I already own?
Yes. We can help identify the cleanest routing path for a surface-mounted conduit, while a licensed electrician completes the electrical installation.
Does a ceiling fan need a fan-rated electrical box?
Yes, a fan needs a box listed and marked for fan support, not a standard light fixture box. We build the mounting point into the beam at the design stage so it is sized correctly for the fan you choose.
Do I need a permit for pergola lighting?
It depends on the fixture and your city or county. Plug-in string lights usually do not need a permit, while a new hardwired circuit or outlet typically does. Confirm with your local building department before work begins.
Can I wire a DIY pergola kit myself?
Many homeowners hire a local licensed electrician to wire a kit after assembly, which keeps the work code-compliant and permitted correctly. Wright Timberframe kits arrive pre-cut and pre-stained, and it is worth asking about wiring path options at order time if you share your fixture plan in advance.
Will wiring be visible on the finished frame?
Not when it is planned. Concealing the wiring path depends on the frame design, and our crew works out the cleanest route with you before the post is cut. Any exit point is finished with the same UV-rated Behr stain as the rest of the frame, so it blends in rather than sitting on the surface.
What is the difference between damp-rated and wet-rated fixtures?
A damp-rated fixture is designed for a covered, sheltered spot, such as most of the space directly under a pergola roof. A wet-rated fixture is built to handle direct rain and snow exposure, which matters more near an open edge or on a louvered roof. Your electrician will match the rating to each fixture’s exact location.
Can You Add Electrical, Fans, or Lighting to a Pergola? Plan It Before You Build
Whether you’re planning simple string lights or a complete package with lighting, ceiling fans, and outdoor outlets, discussing your electrical needs early helps create a cleaner, more seamless timber frame. Every Wright Timberframe pergola is designed, hand-cut, and installed in Utah using traditional mortise-and-tenon joinery, allowing us to plan wiring paths before fabrication begins. Browse our project gallery to see completed projects and get inspiration for your own custom pergola.
When you’re ready to get started, request a free pergola quote and tell us about your lighting, fan, or outlet plans. Our team will help you design a custom timber-frame pergola that fits your space and electrical needs, with a free, no-obligation estimate tailored to your project.

